Soft Sweet Bread Recipe September 28, 2014
Posted by misscraftyfingers in Baking, Recipe.Tags: bread, breadmaker, Recipe, soft bread, soft sweet bread
2 comments
I think I found the best soft sweet bread recipe! I adapted it from this recipe. I made a mistake with that recipe and made some changes and came up with this bread recipe. So far it has yield soft fluffy buns which stays soft the next day! I’ve used it for loaves and sausage/tuna buns.
Mixing is done with a breadmaker. If you do not have a breadmaker, you can refer to this link on how dough can be hand kneaded.
Ingredients – added in this order into breadmaker
200 grams milk mixed with 3 tablepoons of milk powder
1 egg
340 grams bread flour (sieved)
2 tablespoons sugar
1 teaspoon salt
1. 5 teaspoon instant yeast
30 gm softened unsalted butter (added only after 1st cycle)
– After adding in the flour, place sugar and salt on opposite corners.
– Make a dent in the middle of the flour for yeast.
Sweet Bread Autocycle is used (approximately 3 hours 45 minutes) In this cycle, dough is kneaded 4 times, proofed and baked. If baked with oven, temperature is set at 165°C and baked for 25-30mins depending on your oven. Or until the crust is brown enough for you. You can glaze with egg or milk.
After putting all ingredients except butter into the breadmaker, start dough cycle. After first round of kneading, the machine will stop. At this point, put in the softened butter next to the dough. The dough cycles will continue. At the last dough cycle, you can choose to add into raisins/cranberries etc.

Cranberry loaf baked with breadmaker
When the dough cycles are complete, the breadmaker will start to proof the dough. At this point, you can either choose to leave it in the breadmaker and let it bake into a loaf. I find that dough proofs (ie, softer & fluffier) better outside a breadmaker so I usually take it out, let it proof and bake it in the oven. 😀

Cheese cubes, raisins, cranberries wholemeal loaf!
You can also add fillings and make sausage/tuna buns. To know how the shape buns, just search on YouTube, there are plenty of tutorials to help you. That’s how I learnt too! If you like wholemeal bread, you can replace 30 grams of the bread flour with wholemeal flour. 😀 Let me know if this recipe works for you!

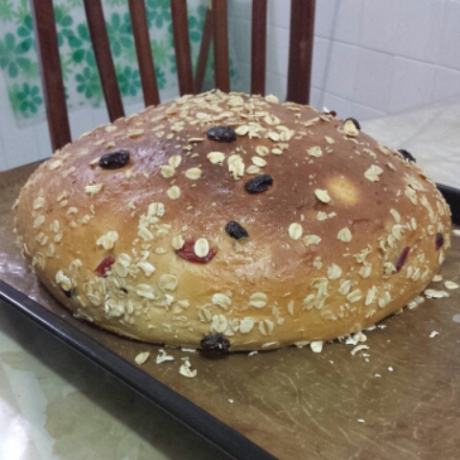
Free form raisin loaf baked with oven cut into thick fluffy slices.
Salted Banana Peanut Butter Chocolate Treats! June 29, 2014
Posted by misscraftyfingers in Cooking, Recipe.Tags: Banana, chocolate, desserts, peanut butter, Recipe, treats
add a comment
Inspired by this, I made these easy peasy Salted Banana Peanut Butter Chocolate Treats!
Ingredients
2 bananas
Peanut butter
100 grams of dark chocolate (1 bar)
1 tablespoon of vegetable oil or milk
Salt
Method
1. Slice bananas into 1.5 cm thickness.
2. Scoop and top 1 side of each banana slice with some peanut butter.
3. Lay on a plate / container and put into freezer until peanut butter hardens.
4. Melt chocolate with vegetable oil or milk.
5. Place each piece of peanut buttered banana on a fork. Drizzle the melted chocolate over until chocolate covers the peanut buttered banana.
6. Lay the chocolate covered peanut butter onto waxed paper on a cookie sheet or plate.
7. Sprinkle some salt over each chocolate covered piece and put them all back into the freezer.
8. Take it out when it’s nicely hardened and cold. Pop into mouth and enjoy the yummies!
Banana Almond Bread (Breadmaker recipe) June 1, 2014
Posted by misscraftyfingers in Baking, Cooking, Recipe.Tags: almond, Banana, bread, breadmaker, homebaked, Homemade, Recipe
6 comments
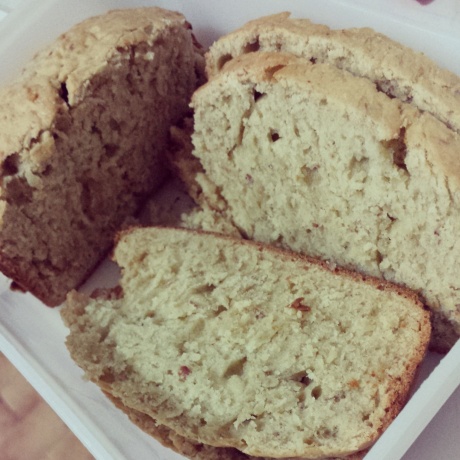
Recently, I bought a really cheap breadmaker online for only S$80 and since then, I’ve baked 3 loaves with it. First one was a basic white bread. Second one was a whole meal bread. And I just baked the latest one! It was an experimental bake and turned out really yummy! So, let me present to you, my BANANA ALMOND BREAD!
I decided to write down the recipe because I’ll definitely make it again. So I’m sharing the recipe with you too!
Banana Almond Bread (Breadmaker Recipe)
Ingredients
2 cups self raising flour (sieved)
1/2 cup sugar
3 tablespoons of softened unsalted butter
1/2 teaspoon of salt (if using salted butter, omit the salt)
3/4 teaspoon of vanilla essence
2 eggs
2 bananas cut up
1/4 cup of chopped almonds (I used raw almonds but roasted will be ok too I suppose)
Method
Put all the ingredients into the bread maker.
Select dough function and let the machine mix the ingredients for around 5 to 7 mins.
* I removed the paddle before baking. It can be a little messy. 😛 but it’ll prevent the loaf from having a big hole at the bottom.
Switch to bake function and bake on medium for 40mins. Switch to dark for 15mins or until top looks browned.
Let it cool before cutting.
That’s it! Let me know if you try the recipe!
My Chinese New Year Weakness: Seaweed Beancurd Skin Crackers February 7, 2013
Posted by misscraftyfingers in Cooking, Recipe, Singapore.Tags: Chinese New Year, cooking, Recipe, Singapore, snacks
7 comments
Every year during Chinese New Year, we would buy or prepare lots and lots of goodies to eat. My neighbour, an aunty who is a really good vegetarian cook, always made this particular snack and give us a jar every year. The jar would not last beyond a day. 😛 I would finish the savoury snack even before anyone else sees it. 😛
I googled around the internet for a recipe but couldn’t find any. Most people use wanton or popiah (springroll) skin but I like the taste of beancurd skin better. So I adapted the recipe using eggwhite wash, but it didn’t quite work out, too salty! Today, my neighbour came by my place when I was attempting the recipe and she taught me her method & tricks on the spot! I was so grateful! 🙂 She said she is very happy that someone else likes her recipe! 🙂
Here’s my neighbour’s recipe! Fast and easy!
Seaweed Beancurd Skin Crackers (suitable for vegetarians)
Ingredients
- 1 large piece of beancurd (tofu) skin (the kind used for making dim sum)
- 6 sheets of nori (large sheets of Japanese seaweed)
- Flour paste – some plain flour mixed with water seasoned with some sugar and/or mushroom granules Note: just a small amount of paste is enough – about 1/2 a ricebowl, it’s used for sticking the seaweed to the beancurd skin.
- Vegetable oil for frying
Method

1. open up the beancurd skin. Wipe beancurd skin with damp paper towels on both sides. Tip: Store bought beancurd skin is salty, wiping it with paper towels will prevent the results from being too salty.
2. Lay out the whole piece of beancurd skin on your kitchen table. Tip: you can wrap your table top with cling wrap for cleanliness. 🙂
3. Brush half of the beancurd skin with the flour paste.
4. Lay the seaweed sheets on one side of the beancurd skin.
5. Brush the seaweed with the rest of the flour paste.
6. Fold the other side of the beancurd skin over to cover the seaweed.
7. Cut into smaller sheets. Leave in fridge for about 15 minutes for the flour paste to dry up a little.
8. With medium heat, deep fry the strips quickly until light golden brown. Remember to keep stirring as they brown very fast. Tip: If the oil is too hot (ie, the crackers turn dark brown very fast), add some more oil to bring down the temperature.
9. Drain and cool on paper towels.
10. Store in air tight containers immediately after cooling to retain crispiness.
Enjoy the crispy crackers!


