My first knitted amigurumi – Kitty Cat! June 30, 2010
Posted by misscraftyfingers in Crafts, Knitting.Tags: Amigurumi, Knit, toy
add a comment
I’m not much of a knitter. I had just been practicing the basic stitches.
Today, I’m sick at home, so I decided to try a little knitted amigurumi (I’ve been a little crazy with crocheted amigurumi for the past couple of weeks).
Anyway, here’s my new kitty. It’s my first knitted amigurumi. Very cute, very easy and fast pattern from here.
OHAI!

I think it looks more like a squirrel from this angle. lol.

I think I stuffed the body a little bit too much that this kitty cat is fat like Chip. 😛

Knitted amigurumi is different from crocheted amigurumi for sure. I enjoyed it though. I think I’m gonna make another kitty cat! 😀
Domo Droid Story by MissCraftyFingers © June 28, 2010
Posted by misscraftyfingers in Blog, Crafts.Tags: Amigurumi, Android, Domo-kun, Funny, handmade, toy
1 comment so far

You probably have to click on the file to see it. i’m not sure. 😛
ENJOY! 😀
My Little Crocheted Android v 2.0 June 26, 2010
Posted by misscraftyfingers in Crafts, Crochet.Tags: Amigurumi, Android, craft, Crochet, handmade, toy
6 comments
So i made a little android robot but i wasn’t completely happy with how it looked (wong colour, head looks different). i wanted it to look like the real thing. So, I made another little android. Here it is! 😀

And here’s the little guy dancing. My little raver robot. If only it has glow sticks. LOL. Maybe I should make a gif with glowsticks. 😛

See next post for droids in action with storyline. hahaha.
My little crocheted Android June 21, 2010
Posted by misscraftyfingers in Crafts, Crochet.Tags: Amigurumi, Android
1 comment so far
This will probably only interest Android fans.
So, as you all know, I bought my first Android phone and I love it. And I think the little green robot is damn cute. lol.
I decided to make this. Wrong green I know …. but it’s the only colour closest to green I have in my stash. I I guess I’m a geek somewhat. 😛

the original robot looks like this:

Pattern for Crochet Version of Ribbed “Lace” Bolero June 15, 2010
Posted by misscraftyfingers in Crafts, Crochet, Free Pattern, Tutorial, Tutorials.Tags: Bolero, Crochet, Tutorial
56 comments
I got a couple of request for the pattern of my crocheted version of the ribbed lace bolero, so here it is.
This is a really easy crochet pattern, inspired from the knitted version here. And it’s not really lace, it’s more like mesh. 😛

Anyway, first of all, measurements. This is based on the description from the knitted version. It’s the same logic as the knit version, so credit’s not mine.
Measure your shoulder span. Add 4 inches for each sleeve. So, if my shoulder span is 17 inches, I add 8 inches to it, which brings about a total of 25 inches.This will be the width of the bolero.
Next, measure your upper arm. Mine measures 12.5 inch. Add 6.5 inch to this measurement. This will be be the length of the bolero, which is 19 inches.
After that, you will have to calculate the number of chains required to start this project.
You will need to chain in multiples of 4 + 2 chain.
So, if for example, my gauge is 4 stitches per inch. My shoulder measurement is a total of 25 inches. So, (25 x 4) + 2 = 102. I will need to chain 102 to start.
If my gauge is 6 stitches per inch, this is how I calculate: 25 x 6 =150. However, 150 is not a multiple of 4, that is, you cannot divide it by 4 and get a whole number. The closest number to 150 divisible by 4 to get a whole number is either 148 or 152. So, in this case, I’d go with 148 + 2. I like my shrug snug rather than loose. 🙂
Abbreviations:
Ch = Chain
SC = Single Crochet
DC = Double Crochet
FPDC = Front Post Double Crochet
BPDC = Back Post Double Crochet
Start of Pattern:
Chain __. (the total # of stitches calculated as per your measurements. Mine’s 102)
Ribbed Row 1: SC into the 2nd chain from hook. SC in the bar of each chain till the end. Ch 3, turn. (This Ch 3 will be your first double crochet).
(SC into the bar of the chain will allow you to have a even finish on both ends of your shrug)

Ribbed Row 2: BPDC into the 2nd SC post. * FPDC into the next 2 SC post. BPDC into the next 2 SC bars.* Repeat from * to * till end. You should end with a BPDC stitch at the end. Ch 3, turn.

The last stitch on the just finished row was a BPDC. When you turn, it will become a BPDC. So, on the new row, you will have to start with a FPDC.
(The ribbing is created with 2 BPDC, 2 FPDC, repeat till end. or 2 FPDC followed by 2 BPDC till end .. depending on which side your crocheting on)
Ribbed Row 3: FPDC into the 2nd post. *BPDC into next 2 posts, followed by FPDC into next 2 posts*. Repeat * to * till end.
Repeat Rows 2 and 3 until the ribbed rows reach about 3 inches, it’s time to start with the body of the shrug.
Body Rows:
Ch 3 at the end of the last ribbed stitch. DC into the top of the 2nd stitch from chain 3. *Ch 2. skip 2 stitches. DC into the next 2 stiches.* Repeat * to * till end. Ch 3, turn. Repeat body row till desired length minus 3 inches is achieved. Ch 1, turn.
Finishing Ribbed Rows:
Finishing Ribbed Row 1: SC into next stitch from chain 1. *2 SC into the space of the chain 2 in the previous row. 1 SC into the top of the next 2 stitches.* Repeat * to * till end.
Finishing Ribbed Row 2: Here you have to check your stitches on the ribbed rows in the beginning. If the corresponding stitch on the other end is a BPDC, then you should start this row with BPDC (or vice versa). So looking at the pictures, row 2 should be done in BPDC into 2nd post of sc, followed by FPDC into next 2 sc posts and BPDC into next 2 sc posts. Repeat till end.
Finishing Ribbed Row 3: This will follow the logic of the beginning rows. Repeat Finishing Ribbed Rows 2-3 till you reach 3 inches of the finishing ribbed rows.

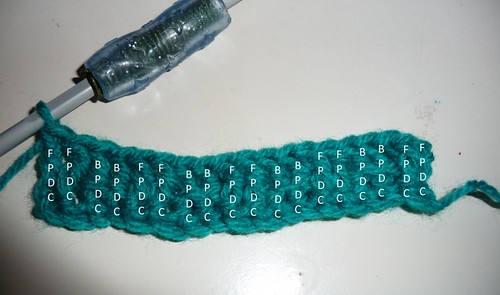
When you’re done, your work should look like this (kinda, this is a miniature version :P)

Fold the ribbed rows ends towards each other. Sew up the matched ribbed rows on each side. This will create the armholes and sleeves of the shrug. (You can sew up the ribbed rows with the ends of your yarn or you can weave in the ends and sew with a matching thread. Whichever way that works for you. :D)

I used about 1 2/3 skein of yarn. The yarn I used was Sirdar’s Wash ‘n’ Wear Double Crepe Dk, fyi. 🙂
The specs of the yarn are:
Blend: 55% Acrylic, 45% Nylon
Ball weight: 100g
Yardage: 270m/296y
I used a 4.25mm, G hook. I didn’t do a gauge but I just measured on my shrug. It’s about 6 stitches per inch across and 3 double crochet rows per inch tall (if that makes sense to you).
I hope the pattern and my explanation makes sense. Let me know if you need clarification or spot a mistake.
Depending on your size, especially if you’re big like me, it’s gonna take a while to crochet this because it’s gonna be a BIG PIECE OF CLOTH by the time you’re done. 😛 If you’re tiny, then I guess you will be able to finish it fast!
The bolero will look like this. You can wear it with the ribbed rows folded or not!


Sorry the pictures aren’t great. I really don’t know how some of the popular crafters take the pictures for their tutorials. I don’t have a tripod nor an awesome camera. It’s so hard to take pics when you’re actually doing the do. 😛
I’d really love comments! And if you do make this bolero, please let me know! I would love to see it! 😀
Have fun making your bolero!
Note: Although the design for this shrug is not entirely original, the crochet pattern is written by me. It is free (like the knitted original) and should never be for sale. Therefore, do not duplicate for commercial purposes. You may use this pattern for personal use only. Thank you.